Share
June 21 - 28

Holiday How-Tos

DIY Vintage Tabletop Ornaments
1 of 14
DIY Vintage Tabletop Ornaments

Materials

  • Open front ornaments or hanging terrariums in various sizes
  • Fake snow (I used a plastic-based snow)
  • Hot glue gun and glue sticks
  • Miniature Christmas trees (also called “bottle trees”)
  • Snow writing pen (or regular paint pen with snow glitter)
  • Various Christmas miniatures and décor that you would like
  • Spray paint (in glitter and assorted colors)
  • Spoon or knife
  • OPTIONAL:
  • Ribbon
  • Beads
  • Glitter

Instructions:

  1. Spray paint the ornaments. *If using proper front-facing ornaments, not terrariums remove metal top before painting. *
  2. Set aside to dry.
  3. Next, take your snow writer or white paint pen and decorate the outside of your ornament. Be as creative as you would like! *If you are using a paint pen, instantly add glitter since you’ll want the glitter to hold in the paint before the paint dries. *
  4. After the outside has dried begin to dry-fit the little scenes into your ornaments.
  5. Once you have everything placed where you like it, hot glue it down. Don’t worry about gluing perfectly! The bottom will be covered in snow, so don’t sweat it if you make a little mess.
  6. Continue this process until all of your table-top ornaments have their scenes complete.
  7. Take a spoon or a knife to add snow to the bottom of the ornaments around your scenes.
  8. Set them up and enjoy your creations this Christmas!
DIY Oversize Mistletoe
2 of 14
DIY Oversize Mistletoe
Level:
Intermediate
How-To:
Christmas Decor
Seasonal Event:
Christmas

MATERIALS:

  • Paper lantern (or styrofoam ball)
  • Large sheets of green paper in two different colors
  • Small white pom poms for the berries
  • Scissors
  • Pencil
  • Ribbon

INSTRUCTIONS:

  1. Figure out the size of your largest leaves and cut out a handful of the larger size in both colors.
  2. Repeat with a medium-size and a smaller size.
  3. Attach the paper onto the styrofoam ball or paper lantern with hot glue starting with the longer ones at the bottom and working your way to the top with the medium and short making sure to use the different colors for dimension.
  4. Continue until the entire ball is covered.
  5. Add the white pom-poms as the berries with hot glue
  6. Add the ribbon at the top in the shape of a bow.
  7. Hang using yarn.

Click here for more Christmas crafts

DIY Christmas Balloons - Maria Provenzano
3 of 14
DIY Christmas Balloons - Maria Provenzano

Materials:

  • Latex balloons in clear and Christmas colors
  • Balloon ribbon in green and desired colors
  • Double stick tape
  • Glittery foam sheets
  • Construction paper in black and various colors
  • Tissue Paper
  • White cardstock
  • Snowflake paper punch
  • Helium tank
  • Hot glue gun and glue sticks
  • Scissors
  • Optional: Balloon cups and sticks

INSTRUCTIONS:

To create the Christmas Light String Balloons

1. Draw a Christmas light bulb, create a 1” x 1” square at the bottom to attach the bulb base and cut out. This is your template.

2. Take various colors of construction paper and fold them in half. Trace the template on the fold of the construction paper and cut out as many as you need.

3. Cut a bunch of 1” x 2” rectangles from green construction paper. Attach to the square part of the bulb
to mimic the base of a Christmas bulb.

4. As many lengths of green ribbon as you want Christmas light strings.

5. Take the bulbs and start attaching them to the string in alternating colors. Sandwich the ribbon in the fold of the Christmas bulbs, secure with double stick tape.

6. Blow up the balloons, tie Christmas light strings on and enjoy!

To create the Ornament Swag Balloons

1. Blow up balloons to about 1/3 full and tie off.

2. Cut a bunch of short ribbons and tie them off to the knots of the balloon.

3. To create the ornament top, cut a rectangle from the glitter foam sheet and secure the ends together to create a short cylinder.

4. Trace the top of the cylinder onto the foam sheet and cut out that circle to cap the top. Glue it on and poke a hole in the center of the top to feed the ribbon through.

5. Repeat steps 3-4 for as many balloon ornaments you plan on making.

6. Slide ornament top you’ve created onto the ribbon of the balloon, covering the knot. Repeat with all of the ornament balloons.

7. Cut a length of ribbon for the swag that is slightly longer than the space where you are hanging.

8. Tie the ends of the balloon ribbons onto the swag length in evenly spaced increments.

9. Hang swag as desired and enjoy!

To create the Christmas Confetti balloons

1. Take tissue paper and cut it into a bunch of tiny pieces to create confetti.

2. Stretch the opening of the balloon out and funnel in confetti with make-shift paper cone or funnel.

3. Blow up balloon with helium tank.

4. Tie String on. If the balloon is too heavy, use a balloon cup and stick.

5. Punch snowflakes out of white cardstock and attach to balloon string or stick.

6. Arrange as desired and enjoy!

DIY Christmas Nightlights
4 of 14
DIY Christmas Nightlights

Materials

  • Fabric Sheets
  • Glue Gun
  • 3” Embroidery hoop
  • Nightlight
  • Ribbon
  • Stencil and fabric paint

Instructions

1. Print image on fabric sheet with ink jet printer or paint with stencils.

2. Cut and peel fabric sheet.

3. Open hoop and sandwich the sheet between large and small hoop and tighten hoop.

4. Trim edges of sheet.

5. Glue onto nightlight.

6. Cover glue with ribbon (optional - you can’t see the glue but makes for a nice design choice).

Download Home & Family's Christmas Workbook here>>

DIY Candy Lights
5 of 14
DIY Candy Lights
DIY Candy Lights
Level:
Intermediate
How-To:
Decor, Home Decor
Seasonal Event:
Christmas, Seasonal

MATERIALS:

  • Plastic bottles/containers
  • LED Christmas lights
  • Mod Podge
  • Food coloring
  • Paint brush
  • Scissors
  • Colored cellophane
  • Rubber bands

INSTRUCTIONS:

  1. Mix Mod Podge and food coloring together.
  2. Paint the outside of the plastic bottles/containers.
  3. Cut a hole in container lids for lights to go through.
  4. Thread lights inside plastic container.
  5. Wrap container with cellophane to look like a piece of candy.
  6. Secure with rubber band on both sides.
  7. Repeat until your finish a full strand of lights.
Peppermint Serving Trays and Bowl
6 of 14
Peppermint Serving Trays and Bowl

MATERIALS:

  • Peppermints
  • Parchment paper
  • Springform pan
  • Baking sheet
  • Candlesticks
  • Hot glue gun and glue sticks
  • Shallow oven safe bowl

INSTRUCTIONS:

TO CREATE THE TIERED PEPPERMINT SERVING TRAY

1. Take a round pan, a springform pan works best, and line it with parchment paper to keep the candies from sticking to the pan.

2. Working from the outside in line the bottom of your pan with the round peppermint candies in rows until it’s covered.

3. To create the top tier, repeat steps 1 and 2 in a smaller pan.

4. Bake them in the oven for 10 minutes at 350-degrees fahrenheit.

5. Remove the pan from the oven and let it cool until hardened.

6. Remove the peppermint plates from the pans.

7. Use hot glue to attach the candlestick to the center of the larger plate. Flip upside right.

8. Glue another candlestick on top of the larger plate and then glue the smaller plate centered on top of that candlestick.

9. Place the desserts and enjoy!

TO CREATE THE PEPPERMINT SERVING BOWL

1. Place the parchment paper into your bowl. Trace around the top edge so you know where to place the peppermints to.

2. Put the parchment paper on a baking sheet. Place peppermints on the parchment paper following the outline of your trace from the outside in.

3. Bake in the oven at 350-degrees fahrenheit for 10 minutes.

4. Remove the peppermints from the oven. Let them cool for one minute.

5. Pick up the edges of your parchment paper and gently place them into the bowl so that it molds to the shape.

6. Allow it to cool completely until it’s hardened. It will take the form of whatever dish you placed it in!

7. Place treats in and enjoy!

DIY Reversible Tree Skirt
7 of 14
DIY Reversible Tree Skirt

MATERIALS:

  • Two different fabrics
  • Fabric scissors
  • Ribbon
  • Sewing machine
  • Beam compass or pencil and string
  • Straight pin
  • Chalk or fabric marker
  • Paper for pattern
  • Iron
  • Fabri-tac or needle and thread

INSTRUCTIONS:

1. Create the pattern for your skirt. Use the beam compass or a string with a pencil tied to it to create your circle pattern on a piece of paper. Draw outer circle first, then a smaller circle inside. Cut a slit from the outer circle to the inner circle and cut it out, this is the opening of the skirt to put around the tree. Cut the along the edge of the larger circle to finish the pattern.

2. Trace the pattern onto each of your fabrics and cut them out.

3. Cut 8 strips of ribbon that will serve as the ties to secure the skirt around the tree.

4. Place the fabric face to face then flip back the fabric on top along the opening of the skirt and place 4 strips of the ribbon strips across from each other on each side along the edges of the slit. They should be on the inside so that when you flip the skirt right side out, they’re on the outside.

5. Pin everything in place except the edge of the inner circle.

6. Sew all of the edges except the inner circle.

7. Cut slits along the seam allowance and press the seams open flat so the edge of the skirt curves smoothly.

8. Flip the skirt right side out and close up the opening of the inner circle. You won’t see the top edge so you can either glue it or use a needle and thread to sew it closed with an invisible stitch.

9. Place under your tree, tie together and enjoy!

DIY Northern Lights Lamp
8 of 14
DIY Northern Lights Lamp

MATERIALS:

  • White fabric in a polyester silk blend
  • Fabric dye in black, green, aqua and blue
  • Glass bowl
  • Eye dropper glass bottles or larger plastic condiment bottles
  • Parchment or wax paper
  • Paper towels
  • Vinyl gloves
  • Water or sink to work next to
  • Fabric scissors or rotary cutter and cutting mat
  • Cylindrical table lamp
  • Black acrylic paint
  • White acrylic paint
  • Artist paint brushes
  • Double-sided tape

OPTIONAL:

  • Drying rack
  • Clothes pins
  • Fray Check

INSTRUCTIONS:

1. First, prep the dyes by boiling water, adding in the dyes and putting each dye into individual droppers or condiment bottles.

2. Measure the circumference and height of your lamp or lampshade, this is the measurement of your fabric.

3. Cut a piece of your fabric to size.

4. Wet the fabric and wring it out so that it is still wet but not dripping.

5. Set the fabric on a glass cutting board if possible, or a surface that you know will not absorb the dye color. Glass works great!

6. Take the dropper filled with the blue dye and drop along the fabric, moving in a top to bottom direction. Make sure to leave some white spots, areas that will represent the stars in the Northern lights.

7. Quickly take the dropper filled with aqua dye and add that color in various areas.

8. Quickly take the dropper filled with black dye and just add black to the top.

9. Quickly take the dropper filled with green dye and add in various areas.

10. Now lift the fabric and let the colors run. Hold this for 2-3 minutes and let the colors mix and run.

PRO TIP: If you can’t hold it, use some clothes pins to hang it up over a non-dye absorbing material.

11. Lay the fabric on a drying rack or a bunch of paper towels and let dry.

12. Once fully dry, take the black acrylic paint on an artist’s brush and draw a straight line across the bottom 1/3 up from the bottom.

13. Build that line up on the left and the right side to look like the silhouettes of mountains.

14. Take white paint and a painter’s brush and dab the fabric to look like stars.

15. Let dry. If you’re worried about fraying, you can add Fray Check to the edges once the fabric is dry.

16. Wrap fabric around your lamp, secure with double-sided tape and enjoy!

Footprint Xmas Art
9 of 14
Footprint Xmas Art
DIY Footprint Xmas Art
Level:
Easy
How-To:
Home Decor, Kids
Seasonal Event:
Christmas

MATERIALS:

  • Non-toxic paint in various colors
  • Canvas
  • Canvas
  • Mod Podge
  • Foam

OPTIONAL:

  • Vinyl stickers and sticker letters

INSTRUCTIONS:

  1. Paint the paint onto the child’s foot or hands.
  2. Press the painted part of the foot or hand flat onto the canvas, do not move it around or you will lose the shape. Allow it to dry.
  3. Paint in the rest of the scene around the foot, you can also use vinyl stickers.
  4. Add lettering if desired with paint and stencils, freehand or with vinyl stickers.
  5. Once all the paint is thoroughly dry, coat the canvas with a layer of mod podge using the foam brush.
  6. Display and enjoy!

Check out more projects to get the kids involved! Santa scopes and paper snowflakes!

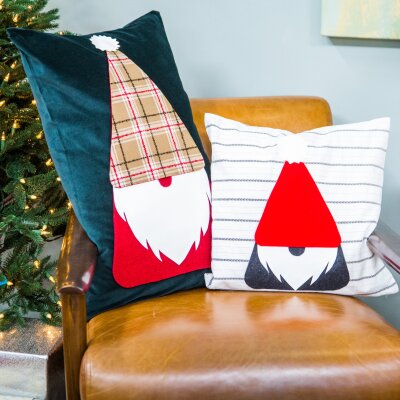
Gnome Pillow Covers
10 of 14
Gnome Pillow Covers
DIY Gnome Pillow Covers
Level:
Easy
How-To:
Home Decor
Seasonal Event:
Christmas

MATERIALS:

  • No fray fabric like felt or fleece in Christmas patterns and colors
  • Faux leather in white
  • Pillow cover
  • Fabri-tac
  • Fray check
  • Fabric scissors
  • Chalk
  • Gnome pattern
  • Scissors
  • Poster board or cardboard
  • Iron

INSTRUCTIONS:

  1. Print the gnome pattern then cut it out. Download the pattern here.
  2. Trace the pieces of the pattern onto the corresponding fabrics you want to use and cut them out with fabric scissors.
  3. To create your pom-pom, trace the bottom of your fabri-tac bottle onto your white fabric then use fabric scissors to cut a squiggly line just outside the circle.
  4. If you’ve used any fabrics that do happen to fray, apply some fray check to the edges.
  5. Press your pillowcase then feed a piece of poster board into the pillowcase to keep from gluing it together.
  6. Arrange the gnome on the pillow to make sure the placement works. Place the body of the gnome first, then layer on the beard, the nose, the hat and place the pom-pom at the tip of the hat last.
  7. Secure everything in with fabri-tac and allow the glue to dry.
  8. Put the pillow inside the cover, set in a cozy spot and enjoy!

Snowmen Bell Choir Display
11 of 14
Snowmen Bell Choir Display

MATERIALS:

  • 12” wooden craft hexagons
  • 5” x 5” wooden squares that are at ¾” thick
  • Snowflake cut out
  • Stencil adhesive
  • White acrylic paint
  • Gray acrylic paint
  • Clear or white glitter
  • Glitter spray in white
  • 2” wood screws
  • Power drill
  • Optional: Smaller hexagons for accent snowflakes
  • Optional: Baking sheet
  • Optional: Smaller
  • Optional: Jigsaw
  • Optional: Sandpaper
Snowmen Bell Choir - Home & Family

INSTRUCTIONS:

1. Paint the hexagons white. These are going to serve as the backboard of your shelves.

2. If you want to round the platform of your shelves, you can cut curves on the corners of your 5” x 5” wooden squares and sand them with a bit of sandpaper to smooth the edges.

3. Paint the shelves white. Allow the paint on all your pieces to dry thoroughly. If you are making accent snowflakes paint and glitter them while you do the rest of the pieces!

4. Paint the platforms gray. Set aside to dry.

5. Applying the snowflake should be done one at a time, since it is time sensitive. Spray some stencil adhesive onto the snowflake cut out and place the snowflake on a hexagon.

6. Paint the hexagon gray over the snowflake and while the paint is still wet sprinkle the glitter all over. The paint will seal the glitter as it dries.

7. Repeat steps 5-6 for as many shelves as you’re making. Allow the paint to dry completely.

8. If the gray paint on your shelf platforms is dry, coat them with glitter spray so they match the backboards.

9. Once the paint is dry, remove the snowflake stencil to reveal a crisp, white snowflake on each of your backboards.

10. Line the platform up so that it sits level about 1/3” of the way from the bottom of the backboard.

11. Screw two 2” screws through the back of the backboard into the shelf to secure it. Repeat with all of your shelves.

12. Hang as desired, display and enjoy!

DIY Elf Brooches
12 of 14
DIY Elf Brooches

MATERIALS:

  • Mini pinecones
  • Wooden beads ½” diameter
  • Brooch pin backs
  • Felt in Christmas colors
  • Baker’s twine
  • Small star beads
  • Fabric scissors
  • Jewelry pliers or tweezers
  • Hot glue gun and glue sticks
  • Optional: E6000

DIRECTIONS:

1. Use your jewelry pliers or heavy-duty scissors to remove the stem from the pinecone.

2. Glue the wooden bead to where the stem used to be, now you have an elf body with a head! Make sure to hide the hole of the bead.

3. Time to add the scarf! Cut a narrow strip of felt and wrap it around the “neck” of your elf. Secure with glue and cut the ends of the scarf at an angle. This will also cover up any excess glue from attaching the head.

4. To make the elf hat, cut a triangle shape that is 2” wide and 2” tall with a slight curve at the bottom. Apply glue along one of the straight edges and roll it onto the other edge to create a cone. Hold until secure.

5. Secure the cone to the head of the elf. Cut a strip of felt and glue it around the bottom of the hat to create a brim.

6. Decorate the hat with the baker’s twine and strips of felt in other colors.

7. Glue a star bead to the tip of the hat.

8. Glue the brooch pin back to the back of the pinecone body. If you want it to be super secure, use E6000 to adhere the backing.

9. Pin onto desired garment and enjoy!

DIY Holiday Napkins
13 of 14
DIY Holiday Napkins

MATERIALS

    TO CREATE THE FELT CHRISTMAS TREE NAPKIN HOLDER:

    • Felt
    • Fabric scissors
    • Paper
    • Chalk or other fabric marking tool
    • Scissors
    • Fabric napkins

    TO CREATE THE ROSEMARY NAPKIN HOLDER:

    • Fresh sprigs of rosemary
    • Grapevine ring
    • Hot glue gun and glue sticks
    • Twine
    • Scissors
    • Fabric napkins

    TO CREATE THE CLOTHESPIN TREE TOPPER NAPKIN HOLDER:

    • Mini clothespins
    • Wooden stars
    • Hot glue gun and glue sticks
    • Gold spray paint
    • Cotton napkins

    INSTRUCTIONS:

    TO CREATE THE FELT CHRISTMAS TREE NAPKIN HOLDER

    1. Print out a Christmas tree silhouette and cut out to create a template. If you’re artistically inclined feel free to draw it!

    2. Use chalk to trace the outline of half of the tree onto the felt. You will cut on the fold to assure that the tree is even on both sides.

    3. Fold your felt in half and use your fabric scissors to cut the tree shape out.

    4. To create a belt for your napkin, cut two slits about 3” from the bottom of the tree that are parallel to each other and about 1” apart.

    5. Fold the napkin into a thin rectangle and feed it through the belt.

    6. Place some cinnamon sticks in with the napkin.

    7. Repeat steps 1-6 for as many place settings as you have.

    8. Set one on each place setting and enjoy!

    TO CREATE THE ROSEMARY NAPKIN HOLDER

    1. Take sprigs of your rosemary and use hot glue to adhere them to the grapevine ring around the outside until the grapevine is pretty much covered.

    2. Cut a length of your twine and tie a bow.

    3. Glue the bow onto the napkin holder. Allow the glue to dry.

    4. Put the napkin into the holder.

    5. Repeat steps 1-3 for as many place settings as you have.

    6. Set one on each place setting.

    TO CREATE THE CLOTHESPIN TREE TOPPER NAPKIN HOLDER

    1. Outside or in a well-ventilated area, spray paint your wooden stars. You can also paint your clothespins if desired. Allow to dry completely.

    2. Hot glue the mini clothespin to the back of the star, make sure the clamping part of the pin is opposite the top point of the star.

    3. To fold your napkin into a Christmas tree shape, begin by folding it in half to create a rectangle.

    4. Fold in the corners on each end so that you have a square shape with a triangle on two opposite sides.

    5. Fold the triangles onto the square so that you have a square with two triangles on top.

    6. Take the square and fold it in half from the center, holding the top of each triangle so they don’t lose their shape.

    7. Take the two right angles that are sticking up on either side and push them down into the tree so all of the angles match from the center point.

    8. While still holding on to the point of the napkin tree, pin the top with the clothespin.

    9. Push all of the folds forward so the back of the tree napkin is flat.

    10. Repeat steps 1-5 for as many place settings as you have.

    11. Set one on each place setting and enjoy!

    DIY Christmas Stocking Holders
    14 of 14
    DIY Christmas Stocking Holders
    DIY Christmas Stocking Holders
    Level:
    Advanced
    How-To:
    Storage, Home Decor
    Seasonal Event:
    Christmas

    MATERIALS

      TO CREATE THE STOCKING WALL HANG:

      • Large branch found outside or purchased at craft store
      • Twine or ribbon
      • Stockings
      • Zip ties
      • Desired hanging materials, hammer and nail work
      • Decorative materials like garland and ornaments
      • Optional: Command hooks
      • Optional: Saw

      TO CREATE THE STOCKING NEWEL POST:

      • Newel post
      • 24” plywood round
      • 3/4” wooden dowel
      • 3/4” forstner bit
      • Phillips head bit
      • Small drill bit for pilot hole
      • Power drill
      • Black spray paint
      • Silver spray paint
      • Lantern
      • Battery operated candle
      • Hot glue gun and glue sticks
      • Pencil
      • Optional: Christmas décor
      • Optional: Saw

      INSTRUCTIONS:

      TO CREATE THE STOCKING WALL HANG

      1. If the branch is too big, cut it down.
      2. Decide how you want to hang the branch, if using nails, figure out the best spacing depending on the shape and size of your branch.
      3. Decorate the branch as desired. You can use garland, lights or any other décor you like! Depending on how you decorate, hanging the branch first could be helpful. Attach with zip ties and hot glue.
      4. Hang the branch if not already done. You can use command hooks depending on the weight of the branch. You could also hang it above a side-table to mimic a mantle.
      5. Attach the stockings to the branch with ribbon or twine. Enjoy!

      TO CREATE THE STOCKING NEWEL POST

      1. To create the base for your post, find the center of your round and attach the newel post to it with a few wood screws from the bottom up. Drill pilot holes first.
      2. On the block top of your post, mark where you want the dowels to go. You want to create a cross section without the dowels actually intersecting. Place one hole at least 1” above the other which should be marked on the adjacent face of the block.
      3. Use the forstner bit to drill through the block top where you’ve marked.
      4. Feed the dowels into the holes. Cut to size before if necessary.
      5. Use hot glue to attach the knobs onto each end of the dowels.
      6. Glue your lantern to the top of your post.
      7. In a well-ventilated area or outdoors spray paint the whole thing black. Allow to dry.
      8. Spray a light mist of silver spray paint to add a metallic finish. Allow to dry.
      9. Put the post in place and decorate as desired.
      10. Drop the battery-operated candle in the lantern and turn on.
      11. Hang your stockings on the dowels and enjoy!

      if you do have a mantle, try out this Stocking holder!
      Make these for the fashionista in your life, faux fur stockings!

      ADVERTISEMENT
      ADVERTISEMENT
      ADVERTISEMENT